Adding a product to Shopify means building a digital bridge between your supplier’s catalog and your customer-facing storefront. It is the process of importing data, syncing inventories, and ensuring that when someone clicks “buy,” the entire logistical machinery moves without a hitch.
There isn’t just one way to do it, and it’s important to set expectations from the start. You can choose the manual path (free, but slow and prone to errors) or lean into the efficiency of automation tools. Each method has its own pros and cons, and the choice will ultimately depend on how quickly you want to scale and how much you value your time.
Why is this step so critical? Because a mediocre product setup kills conversions. It’s not just about aesthetics; it’s about SEO, automation, and scalability. If your product foundations are poorly laid, no marketing strategy will save your store. A professional setup is what separates a money-losing “hobby” from a real dropshipping business that generates revenue while you sleep.
By using AutoDS to eliminate manual tasks, you can forget about tedious data entry. You can import hundreds of products in seconds while maintaining the precision in descriptions and variants that your customers expect.
While manual uploads provide total control for a small number of items, automation is indispensable for scaling a high-volume business without errors.
High visual quality and benefit-focused descriptions are what truly transform a technical import into a real sale.
Success in modern dropshipping depends on transparent shipping times and honest communication with customers.
Publishing products without optimizing titles or SEO ensures invisibility; the human touch is what differentiates you from the mass market.
AutoDS automates your dropshipping business by acting as the logistical brain that syncs prices and stock 24/7, protecting your margins.
What Does It Mean to Add Dropshipping Products to Shopify?
In traditional e-commerce, adding a product is a linear process: you have the physical inventory with you, so you must take photos, describe what you see, and hit publish. But when we talk about Shopify dropshipping, the game changes.
Remember, we are talking about a business model where you don’t store products; instead, you act as the bridge between the supplier and the customer. This is why you must import products from the supplier’s page to show them in your store.
Since you are the intermediary, how you present the product is extremely important. A single item can be displayed in many different ways; the goal, of course, is to make the audience buy from you and not the competition. To achieve this, it’s vital to follow certain standards:
- High-Quality Visuals: Always upload high-resolution images that clearly showcase the product.
- Accurate Descriptions: Write realistic and compelling product descriptions that manage customer expectations.
- SEO Strategy: Keep your business’s SEO strategy in mind by integrating key terms and keywords.
- Social Proof: Add user reviews to build trust with new and potential customers.
Beyond presentation, you must ensure that the product shown in your store is actually AVAILABLE IN THE SUPPLIER’S WAREHOUSE. Selling an out-of-stock item can lead to serious reputation issues with your clients.
That said, there is more than one way to import products to Shopify. Let’s look at the most recognized methods so you can evaluate which one is the most convenient for you.
Ways to Add Dropshipping Products to Shopify
There are 3 main paths you can take to import products to Shopify:
1. Manual Product Creation in Shopify
The most handcrafted method of all. This is primarily used by sellers working with private suppliers or local artisans who don’t have a compatible digital platform. It involves creating every listing from scratch in the Shopify admin, uploading your own photos, and writing every line yourself.
The issue with this method is that it is extremely slow and prone to human error. The biggest risk is the lack of synchronization; if your supplier changes a price or runs out of stock unexpectedly, you won’t know unless you check it manually every day.
If a customer buys at the wrong price or orders something the supplier no longer has, you are the one who ends up losing.
2. Importing Products from Suppliers
This is the middle-ground path. Here, you use browser extensions, specific supplier apps, or CSV file imports. It is a semi-automated approach that lets you pull basic product information into your store faster than the manual method, eliminating the tedious copy-and-paste process.
While it is faster, it often still requires you to process orders one by one or manually update your stock levels periodically. It is functional for getting started, but difficult to maintain as your order volume grows.
3. Using Automation Tools to Add Products
This is where dropshipping turns into a serious business. Automation tools aren’t just a “shortcut” for the lazy; they are a professional workflow layer.
This method allows you to search for, import, and edit products in bulk, ensuring a complete and permanent connection between the supplier and Shopify.
It is the only truly scalable option for the long term. It allows you to manage thousands of SKUs with the same effort it takes to manage just one, ensuring your store always reflects the supplier’s warehouse reality.
How to Add Dropshipping Products to Shopify Manually
If you are working with an exclusive supplier or have a very small catalog, the manual method gives you total control over every detail. Here is a step-by-step guide to ensure you don’t miss a thing.
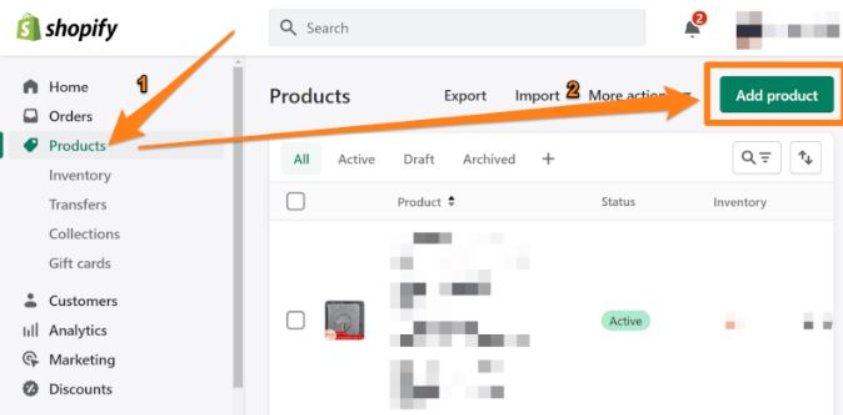
1. Create a New Product in Shopify
The first step is to go to your Shopify admin dashboard. In the left-hand menu, click on “Products” and then the “Add product” button.
This is the foundation of your offer. This is where you will define the product’s identity in your store. Make sure to familiarize yourself with this interface, as you will spend most of your time here if you choose not to automate your workflow.
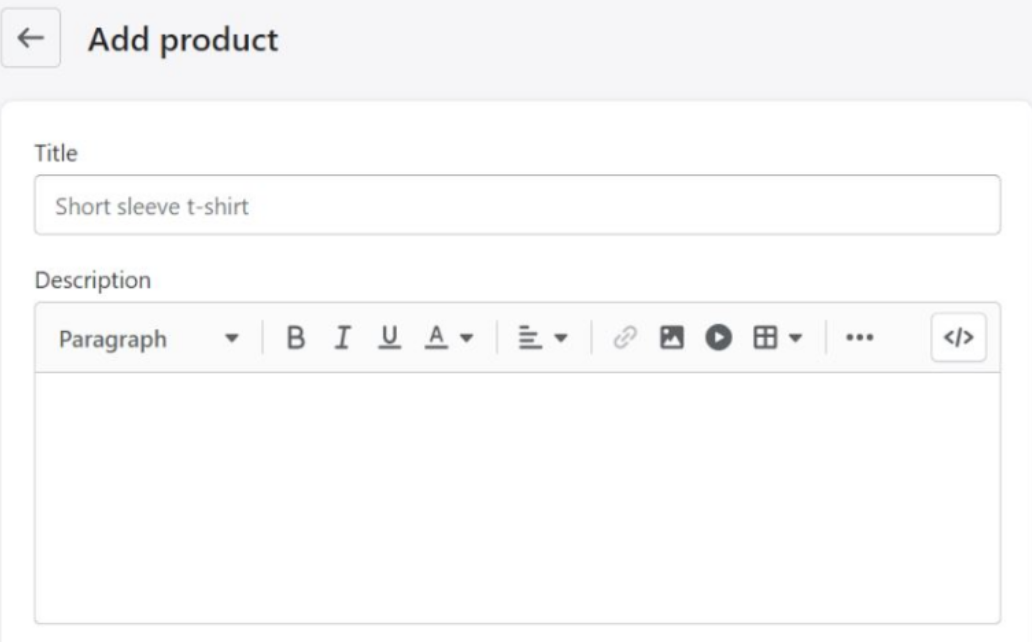
2. Add Product Details and Descriptions
This is where the magic (or the disaster) happens. You must enter the title and description, but avoid blindly copying and pasting your supplier’s wording.
Supplier descriptions are usually technical and dry; you need to inject them with marketing and SEO. Ensure the details are accurate and realistic to avoid returns, while always focusing on the customer’s benefits.
A good search-engine-optimized description is the difference between being invisible and appearing on the first page of Google.
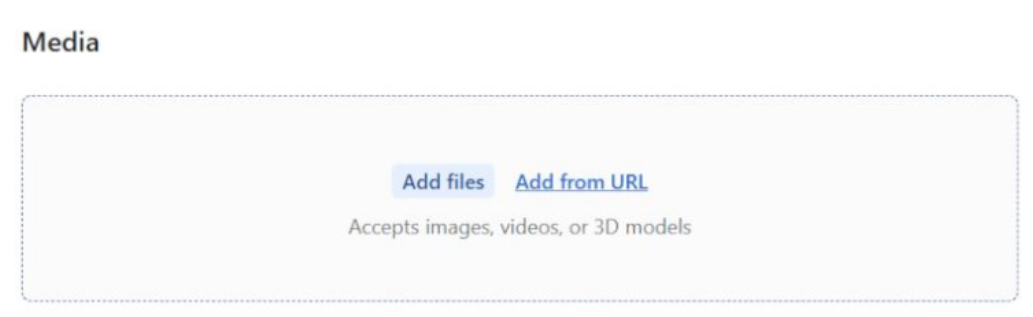
3. Upload Images and Variants
A product is sold through the eyes first. Upload high-resolution images and maintain a consistent aesthetic throughout your store.
If the product has different sizes or colors, use the “Variants” section. Shopify allows you to break down every combination (e.g., Red T-shirt – Size L). It is vital that this structure is clear, as a poorly configured variant can confuse the customer and ruin the shopping experience.
4. Set Pricing and Inventory Settings
This is where dropshipping differs from traditional commerce. In the inventory section, you must understand the no inventory logic: even though you don’t physically have the product, you must check the “Track quantity” option so Shopify knows how many units your supplier has.
Regarding the price, make sure to calculate your margins well (product cost + shipping + taxes + your profit). Remember that in the manual model, if the supplier raises their prices, you will have to come here and change it yourself before you lose money on a sale.
How to Add Dropshipping Products to Shopify Using Suppliers
Depending on where you source, the process for importing dropshipping products to Shopify can vary. Here, we explain how to handle the most popular platforms and what to expect from each one.
1. Add products from AliExpress to Shopify
AliExpress remains the primary entry point for most sellers. To add products to Shopify dropshipping from this platform, the most common method is using a browser extension that acts as a bridge.
The workflow consists of filtering for suppliers with good reviews, choosing the right shipping method (such as AliExpress Selection Standard), and importing the listing.
🆕 Beginner’s Tip: When importing from AliExpress, always clean up the long, keyword-stuffed titles used by Chinese suppliers; this is vital for your Shopify product sourcing for dropshipping.
2. Add products from Amazon to Shopify
Many people wonder how to add products to a Shopify store using Amazon. While it is possible, it involves legal and logistical nuances.
You cannot simply use Amazon Prime for dropshipping (it is strictly prohibited under their terms), so you must find sellers who explicitly allow resale or use Amazon as a catalog for premium products. This method requires very careful descriptions and strict price management, as Amazon prices fluctuate constantly.
3. Add products from other dropshipping suppliers
If you decide to step away from the giants, there are platforms like CJ Dropshipping or local niche suppliers. Each has its own level of complexity: some offer Shopify dropshipping apps for a smooth product import, while others require you to handle CSV files.
The key here is diversification: don’t put all your eggs in one basket, and ensure the import method is compatible with your store’s scalability.
How to Add Dropshipping Products to Shopify Automatically with AutoDS
If you’re looking to scale, I have to tell you: automation is not optional, my young Padawan. AutoDS speeds up the product upload process and adds a layer of control and security to Shopify product importing that manual methods simply cannot offer.
Let’s dive deep into how this ecosystem works:
1. Connect Shopify to AutoDS
The first step is to link your store to the AutoDS dashboard. This integration enables both platforms to “talk” to each other in real time. The purpose of this link isn’t just to move data; it’s about establishing an infrastructure where every change at the supplier level is automatically reflected on your Shopify storefront, eliminating the need for manual updates forever.
This is very easy to do: just click “Add Store” on your main AutoDS marketplace screen, then connect your Shopify store.
💡 Pro Tip: Don’t have a store yet? AutoDS lets you build a perfectly functional, aesthetically pleasing store in less than 2 minutes! Start the race with the winning horse.

2. Find Products Using AutoDS Product Research
Product research is one of the most important aspects of a successful dropshipping store. Not all products sell the same way; some “winning products” have a wider competitive advantage than others. Generally, this is because they:
- They are currently trending.
- They are easy to ship.
- They are priced reasonably.
- Solve a specific problem.
- Target an audience with particular characteristics.
There isn’t just one method to find these products. You can use Google Trends to find information about a product, what it relates to, which country it sells best in, and during what time of year.
You can also check the “Best Sellers” pages of giant platforms like Amazon. And here, AutoDS gives you another advantage: by using the Hand-Picked Products Hub, you gain access to a curated, constantly updated collection of items that increase your chances of selling more and selling better.

3. Import Products with Automation
This is where speed meets precision. While the manual method might take you 20 minutes per product, automation allows you to import hundreds of items with a single click.
This speed doesn’t sacrifice quality; the system captures high-resolution images, optimized descriptions, and all available variants, maintaining a total consistency in your catalog that would be impossible to achieve by hand.
How? You just have to copy the product URL and paste it into the box that appears when you click “Add Product” in the AutoDS marketplace. The best part? You can add more than one product at a time!

4. Sync Pricing, Inventory, and Variants
This is the true differentiator. Learning how to import dropshipping products to Shopify is only half the battle; the other half is keeping them updated.
Automatic synchronization ensures that if a supplier changes a variant’s price or runs out of stock, your Shopify store updates instantly. As your store scales to hundreds or thousands of products, this sync is the only thing protecting your margins and your customers’ reputation.
🚀 Many Shopify dropshippers are already enjoying the benefits of automating their processes. What are you waiting for? Join AutoDS with a trial for only $1!
What to Check Before Publishing Dropshipping Products on Shopify
Before you hit that publish button and launch your Shopify dropshipping product import to the world, you need to make sure the foundation is solid.
There is nothing worse than burning through a marketing budget only to find out a technical error is killing your conversions. This final checklist is what separates the pros from those who are just “trying their luck.”
Product Titles and Descriptions
The title is the first thing the customer sees and the first thing Google reads. Ensure your titles are clear, concise, and include the primary keywords from your Shopify store strategy. As for descriptions, they must focus on benefits, not just technical specs.
A winning description should answer the question: “Why do I need this in my life?” Avoid generic supplier language and make sure the tone of voice is consistent with the rest of your brand.
Pricing and Profit Margins
Price isn’t just a random number; it’s the metric that determines if your business is sustainable or if you’re working for free. When setting your margins, look beyond the product cost.
Consider payment gateway fees, customer acquisition costs (ad spend), and a safety buffer for potential returns. The key here is long-term sustainability; a razor-thin margin might give you quick wins, but a healthy margin is what allows you to reinvest and truly scale your business for real.
Shipping Settings and Delivery Times
This is where most beginners fail. You must be brutally honest and transparent about delivery times. If a product takes 10 days to arrive, make sure the customer knows before they pay.
Configure your shipping zones in Shopify to match your supplier’s actual capabilities. Clarity in shipping drastically reduces support emails and disputes, building a reputation of trust that is worth its weight in gold in e-commerce.
📦 Supplier’s Tip: Looking for quality suppliers? AutoDS provides an extensive network of private and supported suppliers, in addition to offering its own warehousing services, so you can offer fast delivery times in your Shopify store.
Product Variants and Images
Ensure every variant (color, size, material) is linked to the correct image. There is nothing more frustrating for a customer than selecting “Blue” and having the photo still show the “Red” model.
Additionally, ensure all images are of consistent quality and free of other suppliers’ watermarks. A clean, coherent image gallery prevents customer confusion and, most importantly, reduces refund rates for products not as described.
Common Mistakes When Adding Dropshipping Products to Shopify

Even with the best tools, it’s easy to fall into traps that can drain your budget or ruin your reputation in weeks. Identifying these errors before they happen is vital to maintaining a healthy and profitable Shopify product sourcing for a dropshipping strategy.
❌ Overpricing or Underpricing Products
This is a strategic mistake, not a moral failure. Many beginners make the mistake of setting prices too low to beat the competition, forgetting that managing a Shopify store professionally requires covering advertising costs and returns.
On the other hand, an absurdly high price without a clear value proposition will simply kill your conversion rate. Pricing must be a balance between your business’s sustainability and the customer’s perceived value; if you don’t know your numbers, you don’t have a business, you have an expensive hobby.
❌ Ignoring Shipping and Fulfillment Details
Ignoring the shipping fine print is the fastest way to earn chargebacks and lose your customers’ trust. It’s not enough to know how to import dropshipping products into Shopify; you must also know exactly how long it will take for that product to reach the customer’s door.
If you hide delivery times or fail to configure shipping rates correctly, you will face a flood of support emails and potential blocks from your payment gateways. Transparency is your best marketing tool.
❌ Publishing Products Without Optimization
Publishing a product exactly as it comes from the supplier is the cardinal sin of dropshipping. If you don’t optimize titles, images, and descriptions, your store will look like a spam site, and Google will ignore you entirely.
This mistake negates any previous effort put into your Shopify dropshipping product import. As we saw in our checklist, every product needs a human touch (or a smart automation layer) to stand out from the thousands of other sellers offering the exact same thing.
🦾AutoDS to the rescue!
These common beginner mistakes don’t have to worry you if you choose the path of automation. From price synchronization and order fulfillment to listing optimization, AutoDS provides a competitive edge by automating these processes.
This gives you the free time you need to focus on evaluating better marketing strategies, or simply enjoying the rest of your day.
It’s kind of like the plane’s autopilot system. AutoDS imports trending products, updates pricing and images, and even ships orders directly to your customers. This means you don’t have to touch inventory package anything or deal with supply negotiations, you focus on driving traffic and making sales, while the system handles the rest – Dropshipping expert, Mark Tilbury.
Frequently Asked Questions
How do I add dropshipping products to Shopify without holding inventory?
To add products without holding physical inventory, you must use the dropshipping model, acting as a bridge between the supplier and the customer. This is achieved by importing product information (titles, photos, and variants) directly from a supplier’s site to your Shopify store.
Can I add dropshipping products to Shopify for free?
Yes, you can do this entirely for free using the manual method. You simply copy the supplier’s information and create each product listing from scratch in your Shopify admin panel.
What is the fastest way to import products into Shopify?
The fastest way is undoubtedly using automation tools like AutoDS. Instead of copying and pasting data, these tools allow you to import hundreds of products with a single click via browser extensions or direct links. This reduces the process from hours to mere seconds, maintaining data consistency and allowing you to scale your catalog massively almost instantly.
Do I need an app to add dropshipping products to Shopify?
Technically, it is not mandatory, as Shopify allows for manual product creation. However, if your goal is to build a serious and scalable business, a dropshipping app is practically indispensable. Apps don’t just facilitate importing; they manage real-time inventory and price synchronization, something that is humanly impossible to do consistently as your store grows.
Can I add products from multiple suppliers to one Shopify store?
Absolutely. One of Shopify’s biggest advantages is its flexibility to centralize products from different suppliers in a single storefront. You can have items from AliExpress, Amazon, and private suppliers living together in your catalog. The key here is to manage shipping rates well and ensure your customers understand that if they buy products from different suppliers, they might receive their packages at different times.
How long does it take to add products to a Shopify dropshipping store?
The time depends entirely on the method you choose. If you do it manually, setting up a single product with its variants, SEO, and descriptions can take 15 to 30 minutes. With an automation tool, that same amount of time can be used to import an entire collection of 50 or 100 products, as the system handles all the technical information for you.
What happens if a dropshipping product goes out of stock?
If you don’t have an automatic synchronization system, you risk selling a product that the supplier no longer has, forcing you to cancel orders and damage your reputation. If you use automation, the tool will detect the change in the supplier’s warehouse and instantly mark the product as “Out of Stock” in your Shopify store, protecting you from selling “air” and facing customer complaints.
Choose the Right Supplier Strategy with AutoDS
Mastering how to add dropshipping products to Shopify is the first major step toward becoming a serious digital entrepreneur. Whether you prefer the “handcrafted” control of the manual method for a curated catalog or you’re ready to hit the gas with mass automation, the key to success lies in consistency and the quality of your presentation. Remember, you aren’t just uploading images; you are building a brand that must inspire trust from the very first click.
AutoDS automates your dropshipping business by providing a professional workflow layer that synchronizes suppliers and Shopify stores in real time.
By choosing the right sourcing strategy and leaning on tools that protect your margins, you stop being a simple product importer and become the owner of a truly scalable business. The path is set; now the execution is up to you.
⏱ Don’t let manual tasks limit your potential. Experience the power of professional automation and join thousands of successful entrepreneurs. Try AutoDS for just $1 and see the difference!
To continue learning about Shopify, dropshipping, and automation, don’t miss the following articles!