A shopper finds a product they like, adds it to their cart, and then disappears right before paying. Frustrating? Absolutely. Unusual? Not at all. While some shoppers are just browsing, others abandon their carts due to unexpected shipping fees, slow delivery, or a checkout process that feels like filling out a job application.
So, if you’re wondering how to reduce cart abandonment on Shopify, you don’t need to start throwing discounts at everyone.
In this guide, I’ll look at why shoppers leave, how to calculate your cart abandonment rate, and 10 practical ways to keep more sales from slipping away. I’ll also cover Shopify’s built-in abandoned cart recovery tools, what requires an extra app, and when options like SMS reminders are worth the investment.
Cart abandonment is normal, but many causes are preventable. Unexpected costs, slow delivery, complicated checkouts, and lack of trust are common reasons shoppers leave.
Start with simple, low-cost fixes. Show shipping costs and delivery estimates upfront, enable guest checkout, and remove unnecessary checkout fields.
Shopify already includes useful recovery tools. Automated abandoned cart and checkout emails, express payment options, and basic checkout customization can help without expensive third-party apps.
Recover lost sales with timely reminders. Start with abandoned cart emails, then consider SMS and retargeting once your store has enough traffic to justify the extra costs.
Dropshipping stores need to pay extra attention to transparency. Accurate shipping costs, realistic delivery times, and trustworthy product pages can help shoppers feel more confident about buying.
Why Do Customers Abandon Their Shopify Cart?
Not every abandoned cart means something went wrong. Sometimes, shoppers are simply browsing, comparing prices, or saving products for later. In fact, according to the Baymard Institute, “just browsing” is the most common reason for cart abandonment. You can’t fix that with a better checkout page, and that’s ok.
The goal isn’t to reach zero abandoned carts, but to focus on what you can actually control: removing the obstacles that stop customers who want to buy.
So, what makes those customers leave? Here are the most common reasons:
- Unexpected extra costs: Shipping fees, taxes, or other charges make the final price higher than expected.
- Unclear total price: Customers can’t see how much they’ll actually pay until they’re deep into checkout.
- Slow delivery: The estimated arrival date is too far away, especially when shoppers can find faster alternatives.
- Lack of trust: An unfamiliar website, missing reviews, or unclear security information makes shoppers hesitant to enter their card details.
- Forced account creation: Customers have to register before buying, even when they only want to make a quick purchase.
- Complicated checkout: Too many form fields, unnecessary steps, or confusing instructions make the process feel like work.
- Technical and payment issues: Website errors, crashes, or declined cards interrupt purchases.
- Unclear return policies: Shoppers hesitate when they don’t know whether they can return a product or get their money back.
- Limited payment options: Customers can’t use their preferred card, digital wallet, or local payment method.
When dropshipping on Shopify, a few of these problems deserve extra attention. If customers have never heard of your brand, they’re already taking a leap of faith. Add a two-week delivery estimate, shipping fees that only appear at checkout, and a store with barely any reviews or contact information, and it’s easy to see why they might leave.
These aren’t problems every dropshipping store has, but they’re good places to start looking when sales keep slipping away.
What Is A Normal Cart Abandonment Rate? (And How To Calculate Yours)
According to Baymard Institute, the average cart abandonment rate is 70.22%, based on 50 e-commerce studies (last updated September 2025). In other words, roughly 7 out of 10 shopping carts never turn into purchases.
But those numbers vary quite a bit depending on what you’re selling and who’s shopping. According to Dynamic Yield data compiled by Retention Edge, cart abandonment rates for October 2025–September 2026 show:
- By device: Mobile shoppers abandoned 79.53% of carts, compared to 69.56% on desktop.
- By industry: Beauty and personal care averaged 79.94%, while pet care and veterinary services had a much lower rate of 50.4%.
And if you’re wondering what’s normal for a dropshipping store specifically, there’s no reliable, widely accepted benchmark for that business model. Baymard’s average is a useful starting point, but your own month-to-month trend will tell you more.
How To Calculate Your Cart Abandonment Rate
The formula is pretty straightforward:
Cart Abandonment Rate = (Carts Created − Carts Completed) ÷ Carts Created × 100
Let’s say 1,000 shoppers create carts in your store during a month, but only 250 complete their purchases.
(1,000 − 250) ÷ 1,000 × 100 = 75%
That means 75% of those carts were abandoned. Now you have a number you can track and, hopefully, improve.
Where To Find Cart Abandonment Data In Shopify
Here’s an important distinction: cart abandonment and checkout abandonment aren’t the same thing. A shopper might add a product to their cart and leave without ever checking out.
Here’s how Shopify differentiates them:
- An abandoned cart happens when someone adds products but leaves before starting checkout.
- An abandoned checkout happens when someone starts the checkout process, enters their email address, and doesn’t complete payment after more than 10 minutes.
This is how you can find cart and checkout abandonment data in Shopify:
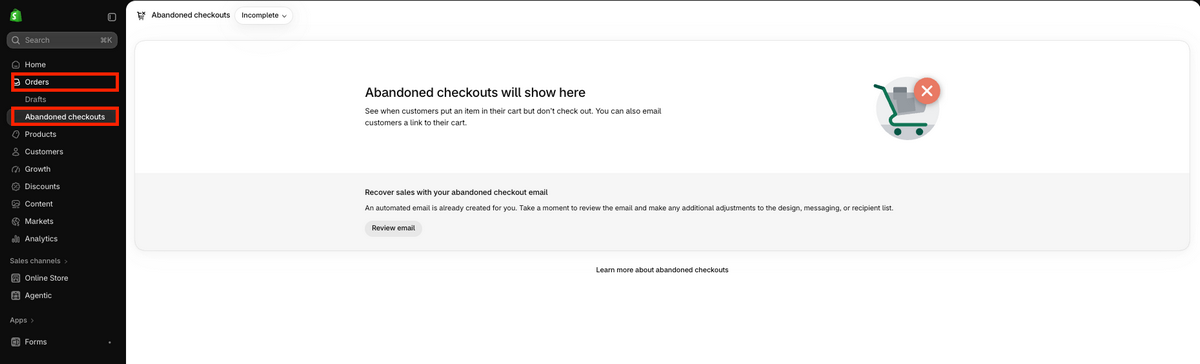
1. Orders > Abandoned checkouts: See individual unfinished checkouts, including customer details and failed payment attempts when available.
2. Analytics > Reports > Behavior > Conversion rate breakdown: See how shoppers move from adding products to their carts to starting checkout and completing a purchase.
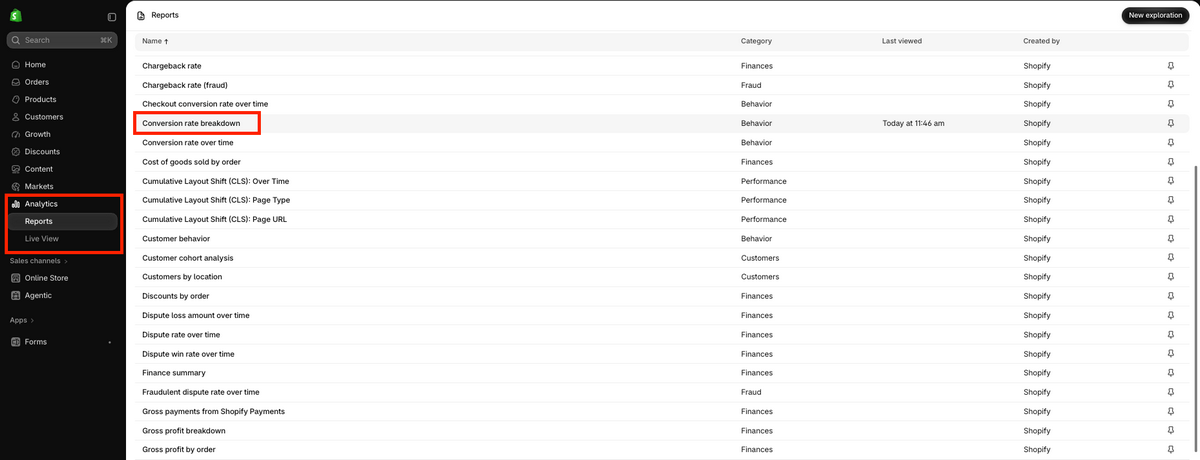
💡 Pro Tip: Keep in mind that Shopify’s conversion reports track sessions, not necessarily individual carts. They’re useful for spotting where customers drop off, but their session-based rates won’t always match a cart abandonment rate calculated from the number of carts created.
What Shopify Already Includes vs. What Needs An App
Before you start installing recovery apps (and adding another monthly subscription to your expenses), it’s worth checking what Shopify can already do for you.
From abandoned checkout emails to faster payment options, several useful features are included in your Shopify plan or available through Shopify’s own free apps.
Here’s what you can use right away and when an additional tool might make sense:
| Feature | Shopify tool or setting | What Shopify offers | When you might need an extra app |
|---|---|---|---|
| Abandoned checkout emails | Shopify Messaging > Automations | Automated recovery emails, free on eligible paid plans. | Advanced recovery sequences or targeting. |
| Guest checkout | Settings > Checkout | Customers can purchase without creating an account. | No app needed. |
| Simplified checkout | Settings > Checkout > Customer information | Make certain fields optional or remove them. | Advanced customization, sometimes requiring Shopify Plus. |
| Express payments | Settings > Payments | Shop Pay, Apple Pay, Google Pay, and PayPal, depending on eligibility. | Additional payment methods or compatible third-party providers. |
| Shipping and delivery information | Settings > Shipping and delivery or Settings > Markets > Shipping | Shipping rates, policies, and eligible delivery estimates. | Cart shipping calculators or supplier-specific estimates. |
| Exit-intent pop-ups | Shopify Forms | Free desktop exit-intent pop-ups. | Advanced targeting or mobile exit-intent features. |
| SMS recovery | Shopify Messaging > Automations | SMS recovery in eligible countries, with per-message charges. | More advanced sequences or unsupported destinations. |
One detail worth knowing: Shopify Messaging and Shopify Forms are first-party apps, not expensive third-party subscriptions. Shopify Messaging also offers abandoned cart emails, although these count toward its monthly email allowance, unlike abandoned checkout emails. You can check the current limits in Shopify’s pricing documentation.
Also, not everything can be customized on every Shopify plan. For example, adding special trust badges or custom content directly beside the payment fields generally requires Shopify Plus and a compatible checkout app. On a Basic plan, you can still build trust through your product pages, cart, customer reviews, and clearly displayed store policies.
My advice? Start with what you’re already paying for. Get the basics working, track your results, and only add third-party tools when there’s a specific problem Shopify’s existing features can’t solve.
10 Ways To Reduce Cart Abandonment On Shopify (Ranked By Effort vs Impact)
Not every abandoned cart needs a festival lineup of apps or a complicated checkout redesign. Some of the most useful fixes are completely free, and you can make them right from your Shopify dashboard.
I’ve put together 10 strategies to reduce cart abandonment on Shopify, all organized by effort and potential impact, starting with the quickest, cheapest improvements all the way to more costly or complex ones. The table also shows which problems each fix addresses, using Baymard Institute’s 2026 cart abandonment research as a reference.
| Fix | Effort | Impact | Cost | Native Shopify or app? | Abandonment reason addressed (Baymard) |
|---|---|---|---|---|---|
| Show shipping, tax, and total cost early | Low | High | Free–low; cart display apps may cost extra | Native settings; theme or app for cart displays | Extra costs too high (40%); unclear total (12%) |
| Show honest delivery estimates | Low | High | Free–optional app costs | Native settings, theme, or app | Slow delivery (20%) |
| Turn on guest checkout | Low | High | Free | Native Shopify | Forced account creation (18%) |
| Trim the checkout form | Low | High | Free | Native Shopify | Long or complicated checkout (17%) |
| Add Shop Pay and express wallets | Low | High | Free to enable; payment fees apply | Native or compatible payment provider | Too few payment methods (9%) |
| Add trust signals near payment | Low | High | Free–low; review apps may cost extra | Native policies; optional review apps | Payment security concerns (19%); unsatisfactory returns policy (13%) |
| Set up abandoned cart emails | Low | High | Free initially; usage or app fees may apply | Shopify Messaging; optional advanced apps | Recovers unfinished purchases; no direct Baymard share |
| Speed up the store and test mobile checkout | Low–medium | High | Free–optional app costs | Native reports and testing tools | Website errors or crashes (17%) |
| Use an exit-intent pop-up carefully | Low | Medium | Free–optional app costs | Shopify Forms; advanced apps | Targets shoppers about to leave; no direct Baymard share |
| Add SMS and retargeting later | Medium–high | Variable | Paid messages and advertising | Shopify Messaging, ad platforms, or apps | Recovers unfinished purchases; no direct Baymard share |
Note: Baymard’s percentages represent reasons US shoppers gave for abandoning purchases, excluding those who were just browsing. Respondents could select multiple reasons, so the figures don’t add up to 100%. They’re not estimates of how much each fix will improve your conversion rate. Effort, impact, and cost are practical estimates.
1. Show Shipping, Tax, and Total Cost Early
Nobody likes finding out that their $25 purchase suddenly costs $38 at checkout. If shoppers don’t know what they’ll actually pay until the final step, you risk losing them right when they’re ready to buy.
The good news? This is one of the easiest things to fix on Shopify:
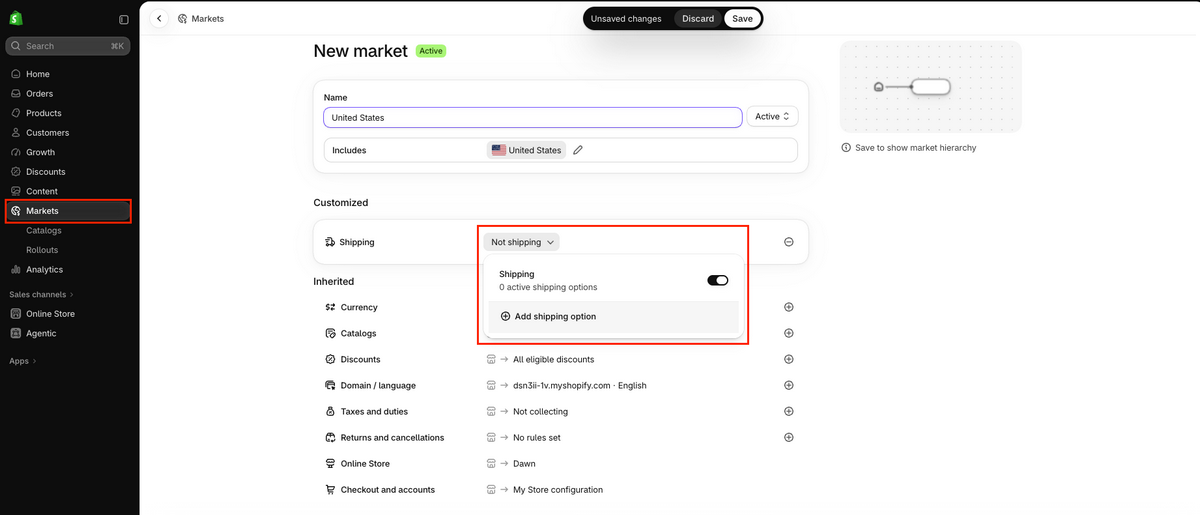
- Make shipping costs visible early. First, set up your shipping rates in Shopify under Settings > Markets > Shipping. Then, go to Online Store > Themes > Customize to display those costs on your storefront. You can add a text block to product pages or use your theme’s announcement bar for a message like “Flat $5 shipping on all orders.” If your shipping costs vary by location or order size, displaying a personalized estimate in the cart may require a theme feature or an app.
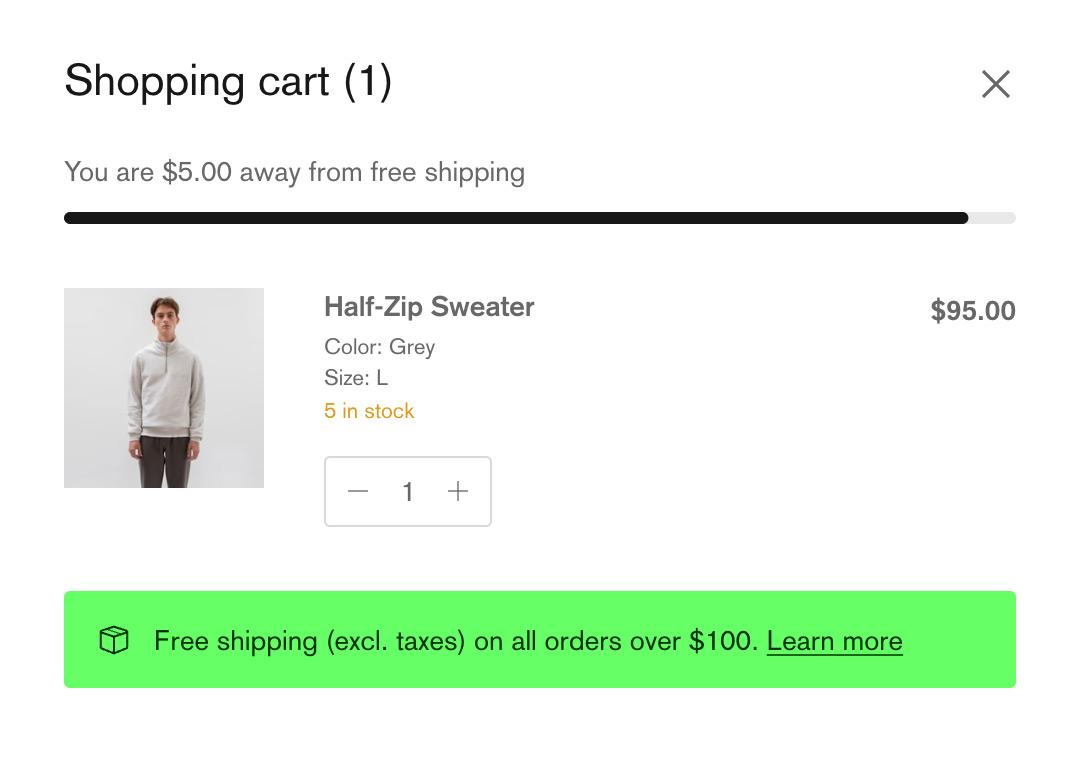
- Make free-shipping thresholds obvious. A simple message like “Free shipping on orders over $100” works perfectly fine. Configure your free-shipping threshold under Settings > Shipping and delivery, then go to Online Store > Themes > Customize to display it using your theme’s announcement bar. Even better, show customers how close they are to qualifying with a dynamic progress bar (available in some themes or through an app). Just make sure your shipping rate strategy still leaves enough room for profit.
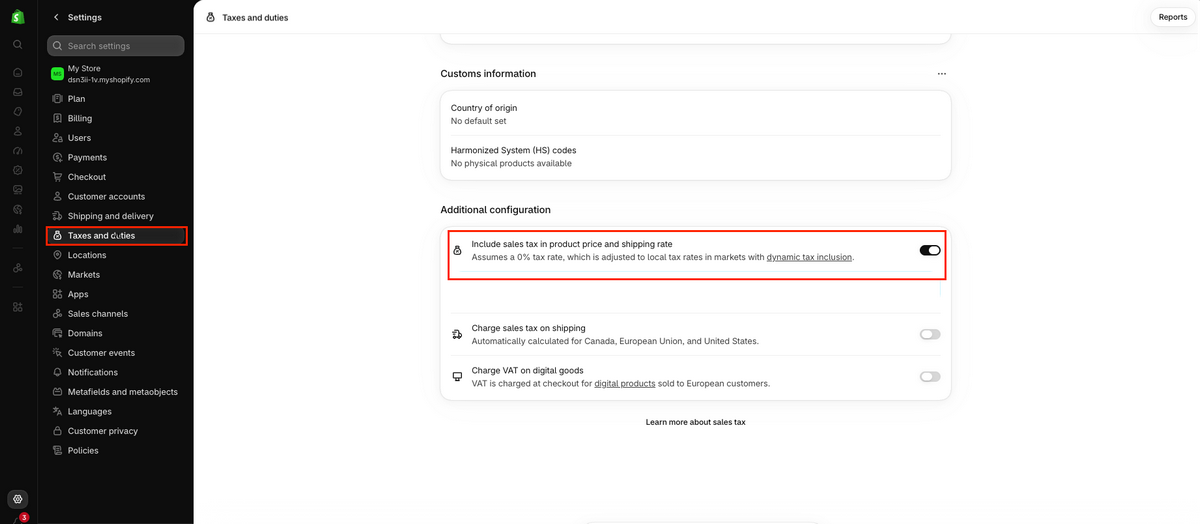
- Be upfront about taxes. In Shopify, go to Settings > Taxes and duties and enable Include sales tax in product price and shipping rate if appropriate for your market. You can also configure tax-inclusive pricing by region through Shopify Markets.
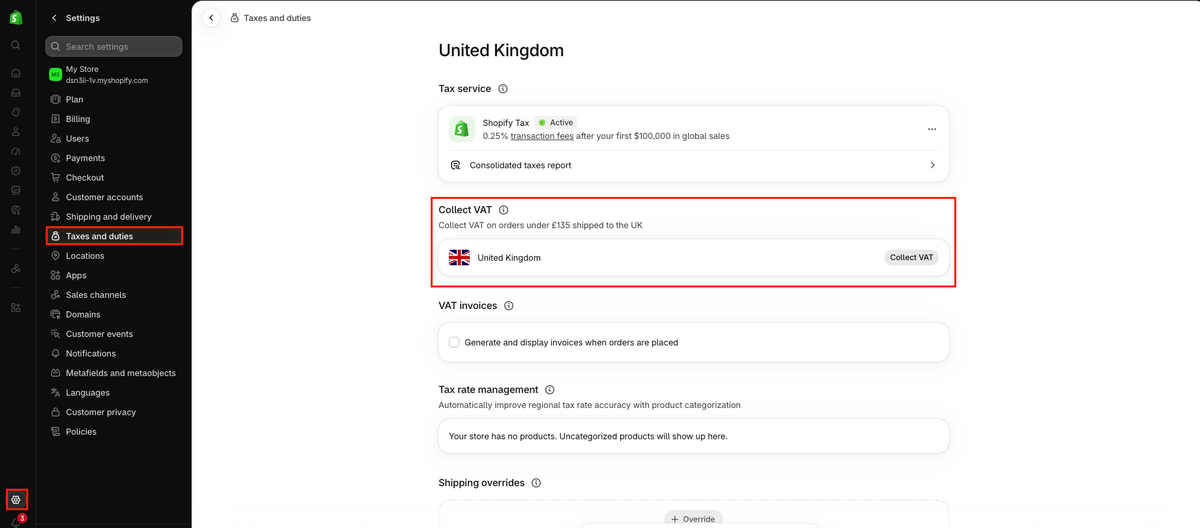
- Don’t forget international orders. If you’re selling across borders, explain whether customers might pay import duties or taxes on delivery. Shopify lets eligible stores collect estimated duties at checkout through Settings > Taxes and duties, provided their shipping carrier supports DDP. If your dropshipping supplier doesn’t support this, make potential extra charges clear in your shipping policy and product pages.
For dropshipping stores, there’s another decision to make: should you include your supplier’s shipping cost in the product price or charge it separately?
Say your supplier charges $18 for a product and $6 for shipping. You want to earn $12 before payment processing fees, taxes, and other expenses. You could sell it for $36 with free shipping or charge $30 plus $6 for delivery. Either way, the customer pays $36, and your gross profit is $12.
💡 Pro Tip: With AutoDS, the Include Shipping Price feature lets you factor supplier shipping costs into your product pricing automatically. You’ll find it under Settings > Supplier Settings > Pricing. Just make sure you’re not also charging the same shipping cost at checkout, and note that this feature doesn’t apply when Ship to Country is set to Worldwide.
2. Show Honest Delivery Estimates
Nobody wants to wait three weeks for something they thought would arrive in three days. And for dropshipping stores, delivery times can be particularly tricky, especially when you’re sourcing products from overseas.
The best approach is to set realistic expectations before customers reach checkout. Here’s how:
- Be clear about processing and shipping times. If your supplier takes 2 business days to process an order and another 6-9 days to deliver it, tell customers to expect approximately 8-11 business days, not just 6-9.
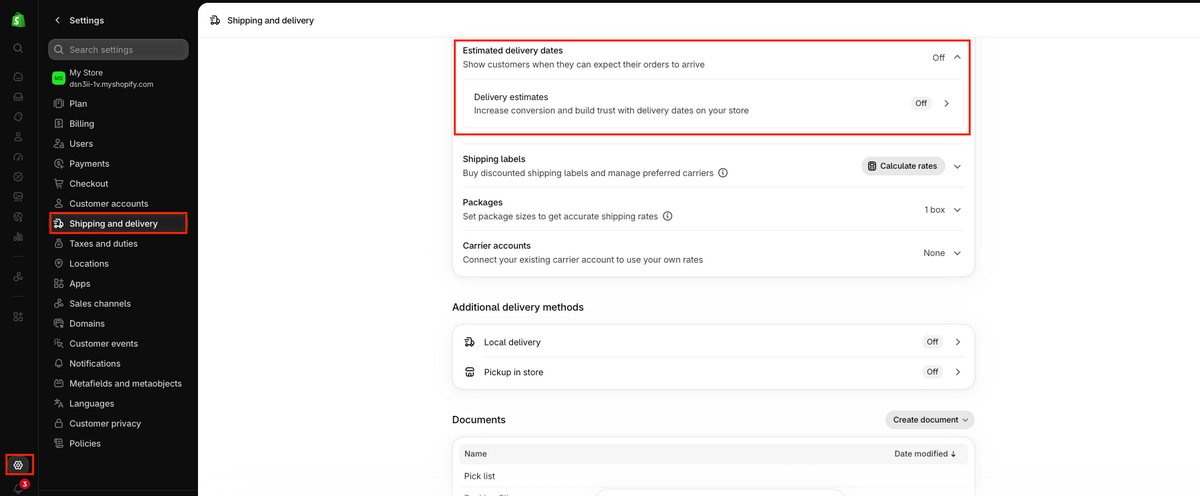
- Show delivery estimates in multiple places. Include them on product pages, in the cart, and in your shipping policy. When setting up shipping on Shopify, you can also configure delivery estimates at checkout under Settings > Shipping and delivery > Estimated delivery dates, although this feature doesn’t support third-party dropshipping apps.
- Use your supplier’s actual delivery times. Check processing times, warehouse locations, and shipping methods for each destination. If you’re working with multiple suppliers, don’t promise the same delivery window for every product.
- Leave room for delays. Holidays, customs, and carrier issues can affect delivery times. Use realistic ranges based on supplier performance rather than promising the fastest possible arrival date.
📦 Supplier’s Tip: Being transparent doesn’t mean customers will happily wait a month for their phone charger. If long delivery times are driving shoppers away, consider working with faster dropshipping suppliers, especially those with warehouses closer to your target market.
The point isn’t to promise the fastest shipping, but to deliver when you say you will. A realistic 10-day estimate is much better than a promised 3-day delivery that takes two weeks to arrive.
3. Enable Guest Checkout
Imagine finding the perfect product, adding it to your cart, and then being asked to create an account before you can pay. Another password to remember? No thanks.
Guest checkout lets customers complete their purchases without registering or signing in, removing an unnecessary step between adding a product to their cart and placing an order.
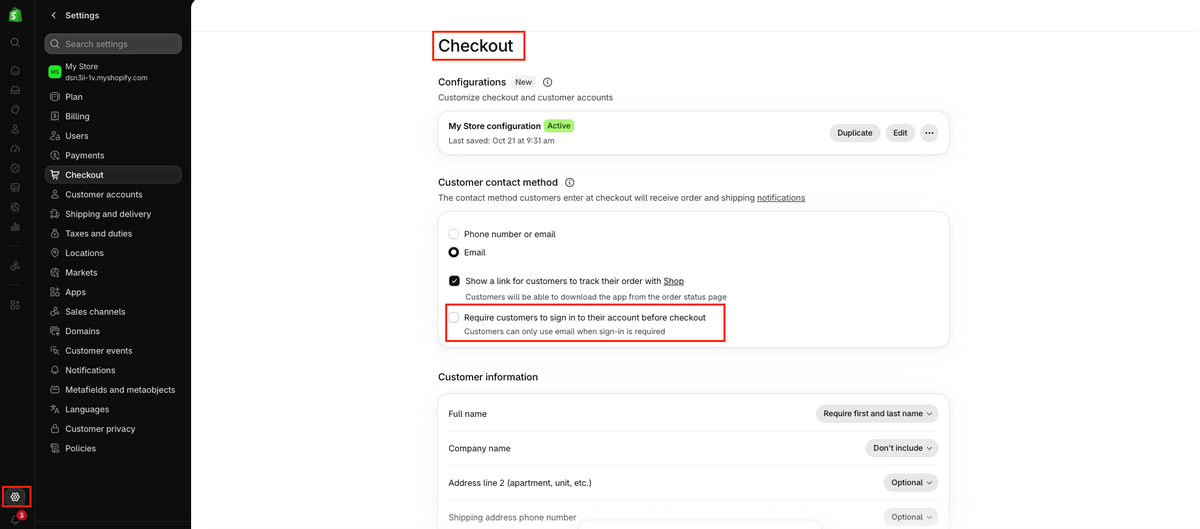
Shopify supports guest checkout natively, so you don’t need an extra app. Here’s how to enable it:
- From your Shopify admin, go to Settings > Checkout.
- Find the Customer contact method section.
- Make sure Require customers to sign in to their account before checkout is unchecked.
- Save your changes.
And don’t worry about losing the benefits of customer accounts. With Shop Pay, shoppers can choose to save their shipping and payment details for faster future purchases, even when checking out as guests. It’s optional, so they can decide whether to save their information.
The idea is simple: make buying easy now and let customers decide about creating an account later.
4. Trim The Checkout Form
Nobody wants to fill out a dozen fields just to buy a phone case. And the more information you ask for, the more chances customers have to get frustrated and leave. According to the Baymard Institute report I’ve been mentioning, the average checkout in its benchmark has around 23 form elements, even though an optimized checkout can work with as few as 12–14.
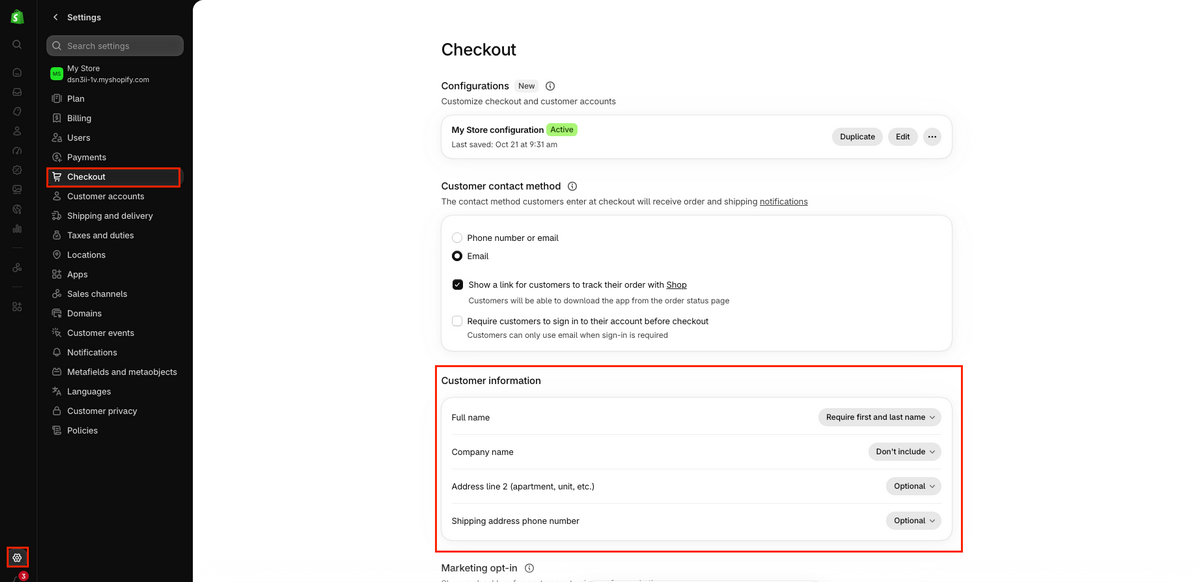
Luckily, Shopify lets you simplify some fields without installing an app. Just go to Settings > Checkout > Customer information, where you can:
- Remove the company name field if you’re selling directly to consumers.
- Make Address line 2 optional so customers who don’t live in apartments can skip it.
- Make the shipping phone number optional or remove it if your fulfillment process doesn’t require it.
- Remove the company VAT number field if it’s irrelevant to your customers.
For dropshipping stores, though, don’t remove information your supplier actually needs. You’ll still need an accurate shipping address, including apartment numbers when applicable, and some suppliers or carriers require a phone number for delivery.
The goal is to remove unnecessary questions, not essential shipping information. A checkout that takes 30 seconds longer is annoying, but a package that never arrives because you didn’t collect the right address is much worse.
5. Add Shop Pay And Express Wallets
The fewer details customers have to type, the better. That’s where express payment options come in. Instead of manually entering their card number, billing address, and shipping details, shoppers can complete their purchases using information they’ve already saved.
Shopify supports several options:
- Shop Pay: Shopify’s accelerated checkout saves customers’ payment and shipping information for faster future purchases.
- Apple Pay: Lets shoppers pay using their Apple devices, often with Face ID or Touch ID.
- Google Pay: Allows customers to use their saved payment and shipping details without filling everything out again.
- PayPal: Gives shoppers a familiar way to pay without entering their card details directly into your store.
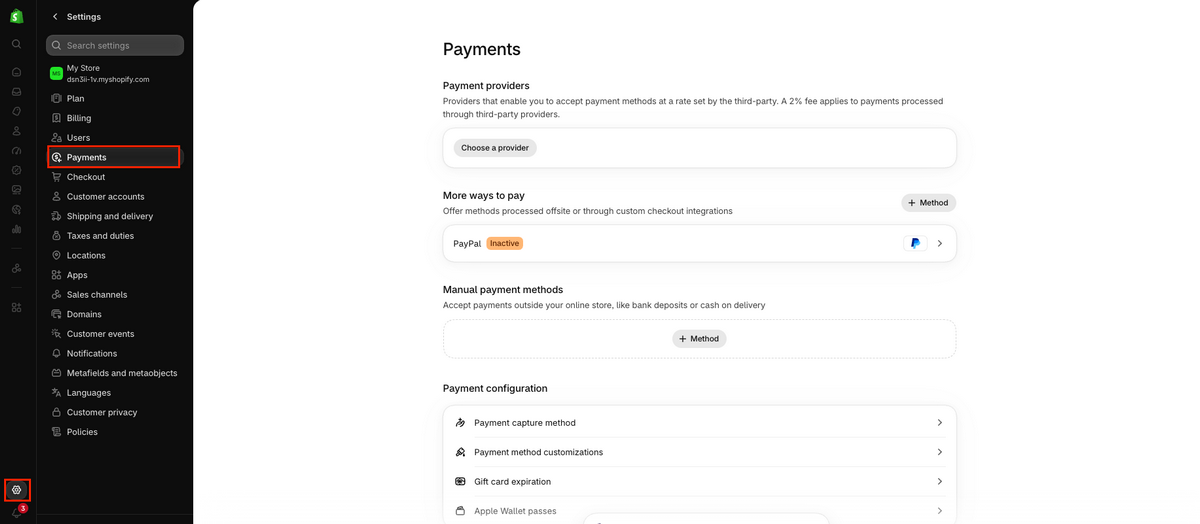
To enable these options, go to Settings > Payments in your Shopify admin. If you’re using Shopify Payments, click Manage to configure Shop Pay and supported wallets. PayPal may require a separate setup under Additional Payment Methods, depending on your country.
One catch: Shopify Payments isn’t available everywhere. It’s supported in countries including the US, UK, Canada, Australia, and much of Europe. You can check the full list of supported countries.
If Shopify Payments isn’t offered where your business operates, you can choose a compatible third-party provider under Settings > Payments. Look for one that supports Apple Pay, Google Pay, or local payment methods. Shop Pay has additional eligibility restrictions, so it won’t necessarily be available with your provider.
Finally, test your checkout on different devices. Not every wallet appears for every shopper, and that’s normal. The goal is to offer convenient, familiar ways to pay, not overwhelm customers with a dozen payment buttons.
6. Add Trust Signals Near The Payment Step
Would you trust a store you’ve never heard of with your credit card details? Probably not without checking a few things first. For new dropshipping stores, building trust is especially important because customers don’t have an established brand reputation to rely on.
Here are a few ways to make shoppers feel more comfortable before paying:
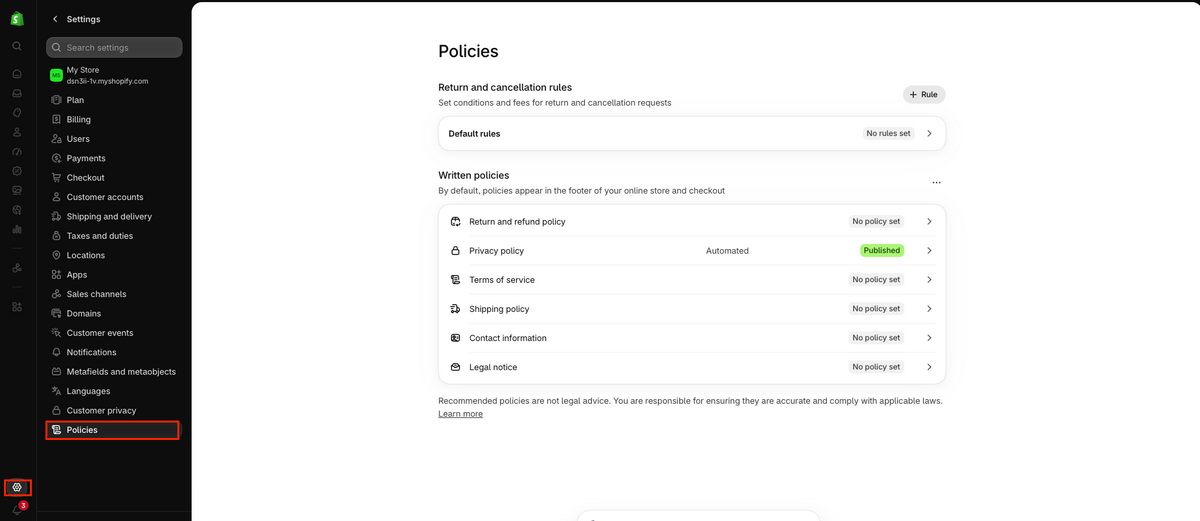
- Make your store policies easy to find. Add clear refund, shipping, privacy, and terms of service policies under Settings > Policies. Shopify automatically links them in the checkout footer, but you should also make them accessible from your storefront. You can use our Shopify privacy policy generator as a starting point, then customize the text to reflect how your store actually operates.
- Display contact information. A visible support email, contact page, or live chat option reassures shoppers that there’s someone to reach if their order goes wrong.
- Show secure payment badges. Display recognizable payment logos and legitimate security indicators near your cart or checkout buttons. Just make sure they reflect the payment methods and protections your store actually offers.
- Include customer reviews. Real feedback, especially reviews with photos, can help unfamiliar shoppers feel more confident. Some Shopify review apps let you collect and display verified customer feedback directly on your product pages.
One Shopify limitation worth mentioning: customizing the actual payment step generally requires Shopify Plus. If you’re using a Basic plan, focus on placing these trust signals on your product pages and cart, where customers can see them before entering checkout.
🆕 Beginner’s Tip: If your store is new, don’t fake reviews. Clear policies, honest delivery estimates, and accessible support build more trust. Once orders start coming in, ask customers for reviews and consider offering a small discount, regardless of their feedback.
7. Set Up Abandoned Cart Emails
Sometimes, shoppers just get distracted. They open another tab, get a phone call, or decide to finish buying later and forget about it. An abandoned cart email gives them a gentle reminder, with a link that takes them back to checkout.
And these reminders can make a difference. According to Klaviyo’s 2025 benchmark report, abandoned cart email flows had an average 2.68% placed-order rate across e-commerce industries.
Luckily, Shopify includes abandoned cart and checkout recovery emails. Here’s how to set them up:
1. From your Shopify admin, go to Apps > Messaging > Automations. If you don’t already have the app installed, just search for “Messaging” and install it.
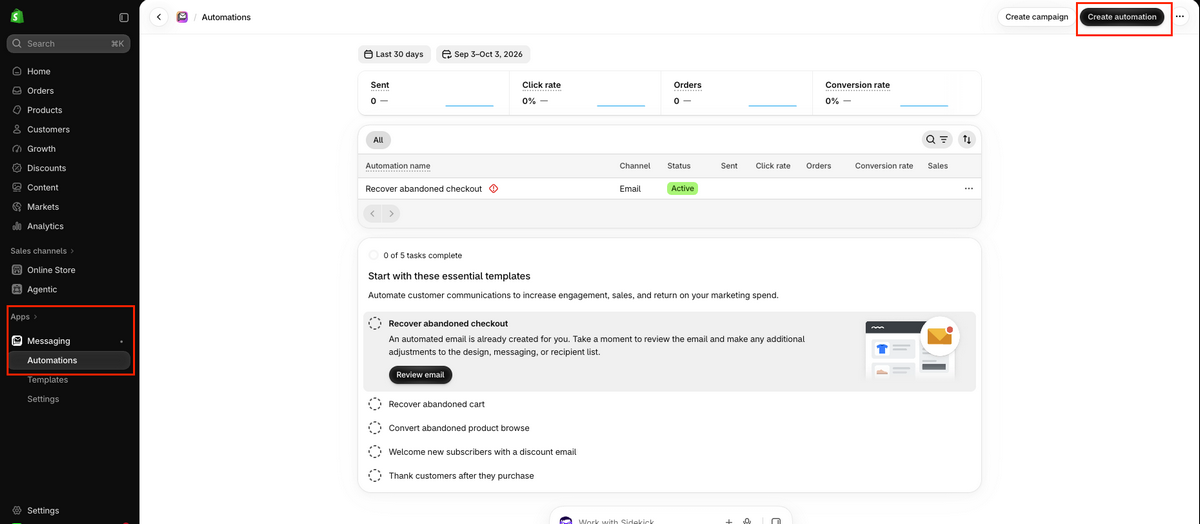
2. Click Create automation and select Recover abandoned cart or Recover abandoned checkout, depending on which shoppers you want to reach.
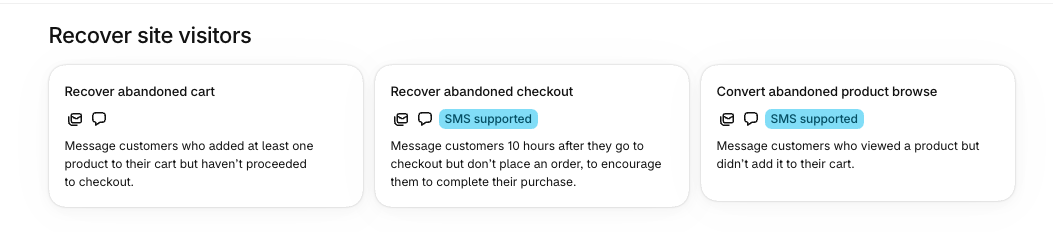
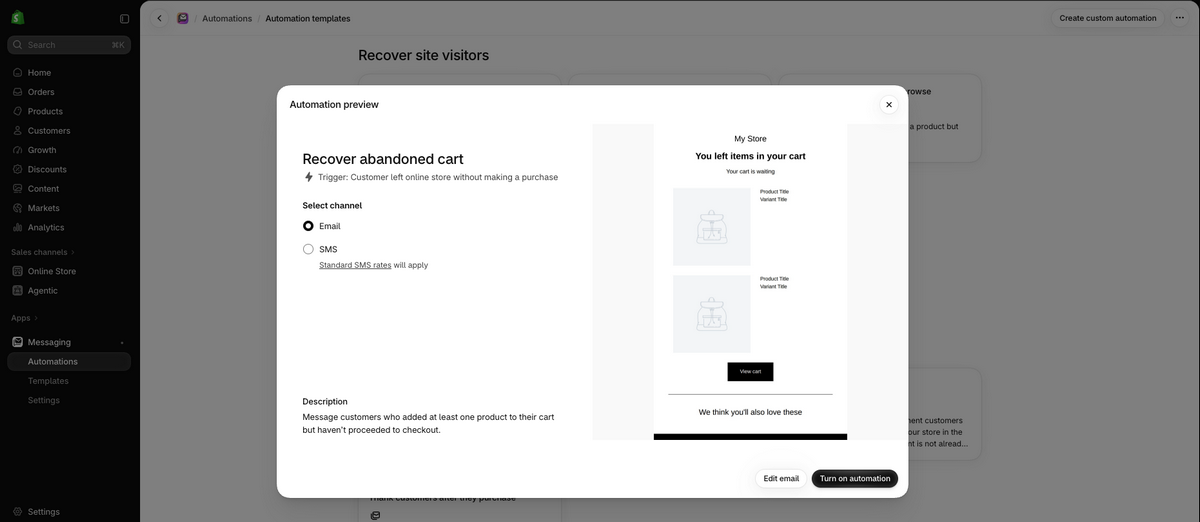
3. Choose Email as your communication channel.
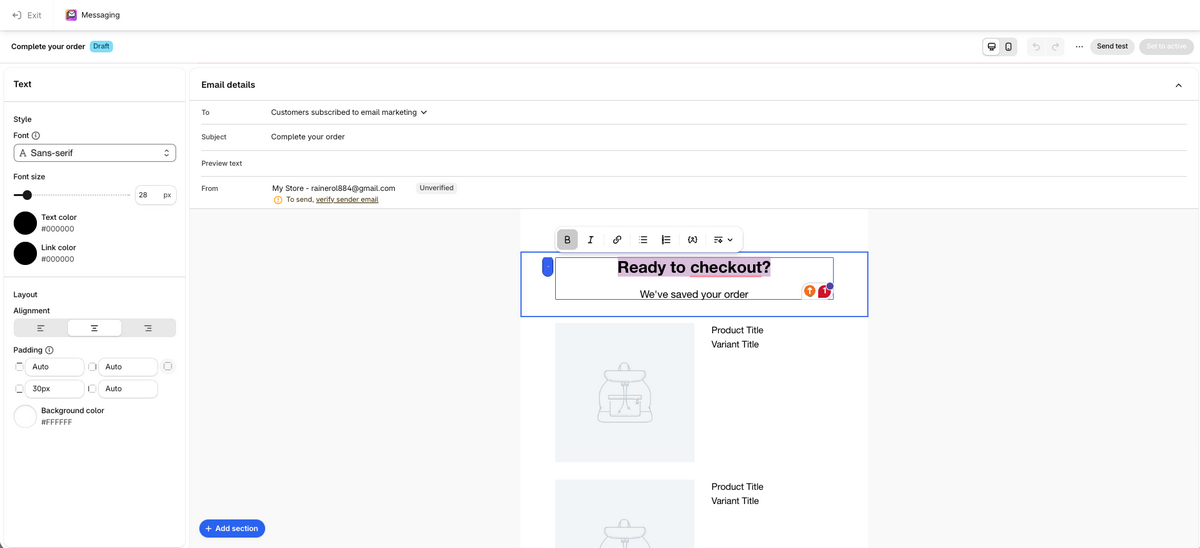
4. Click Edit email to customize your subject line, message, branding, and cart recovery link. You can also choose whether to target email subscribers or all eligible customers.
5. Review the automation’s timing and click Turn on automation.
Both cart and checkout recovery options are worth using: cart reminders can bring back shoppers earlier in their journey, while checkout reminders target those who were closer to buying.
Now, the 10-minute rule doesn’t mean reminders go out immediately. Shopify’s abandoned checkout automation uses a 10-hour delay by default for a newly created workflow, which you can adjust using Shopify Flow.
One email is a good start, but you can also test a three-email sequence. For example:
- Email 1 (2–4 hours): A friendly reminder showing the products left behind and a direct link to finish checkout. No discount necessary.
- Email 2 (24 hours): Address a possible hesitation. Remind customers about shipping costs, delivery estimates, or your return policy.
- Email 3 (48–72 hours): Consider offering a small discount or free shipping if your margins allow it. Don’t give away your profits just to recover a sale.
These timings are a starting point to test, not a universal formula. Shopify’s standard template handles the initial reminder. A more advanced multi-email sequence may require customizing a workflow with Shopify Flow or using a dedicated email marketing app. Make sure follow-ups stop once a customer makes the purchase.
And remember, the goal isn’t to chase shoppers around their inbox, but to make completing their purchase easy when they’re ready.
8. Speed Up The Store And Test Mobile Checkout
Your store might look perfect on a laptop, but what happens when someone tries to buy something on their phone? According to recent reports, mobile shoppers abandon around 79.5% of carts, compared to 69.6% on desktop (October 2025–September 2026).
A product page that loads slowly, a checkout button hidden behind a pop-up, or a payment form that won’t load can be enough to lose a sale. That’s why it’s worth making mobile testing part of your weekly routine:
- Place a test order on your phone. Go from product page to payment using Shopify’s test payment options, where available. Check that buttons, discount codes, shipping options, and payment methods work properly.
- Check your store’s speed. Go to Online Store > Themes to view Shopify’s web performance summary, or use Google PageSpeed Insights to test individual pages.
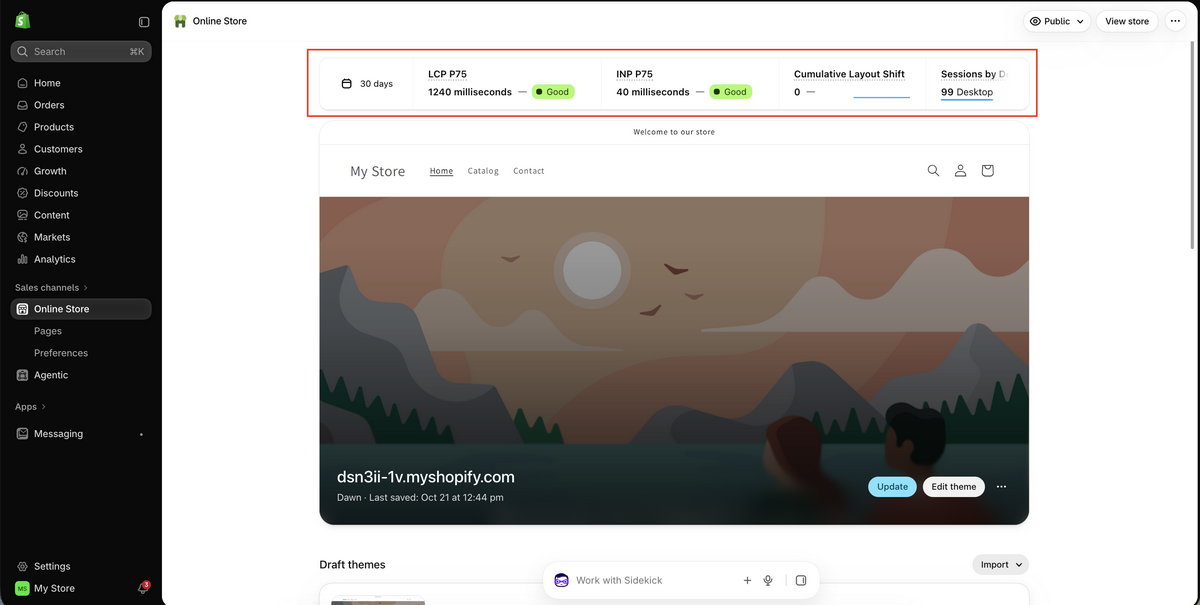
- Look for unnecessary slowdowns. Large product images, excessive animations, and too many apps can affect loading times. Before paying for another tool, review your existing apps and consider whether an image or speed optimization app would actually solve the problem.
- Check for checkout errors. Test different shipping addresses, payment methods, and discount codes. A broken shipping rate or rejected payment can stop a perfectly willing customer from buying.
💡 Pro Tip: Test using mobile data, not just your home Wi-Fi. Your store might load beautifully on a fast connection but struggle on a slower network. And your customers won’t all have the same internet speed.
9. Use An Exit-Intent Pop-Up Carefully
Sometimes, a little attention is all it takes to keep someone from leaving. An exit-intent pop-up appears when a shopper is about to leave your store, giving you one last chance to address their hesitation or offer an incentive.
You can set one up for free using Shopify Forms, Shopify’s own app:
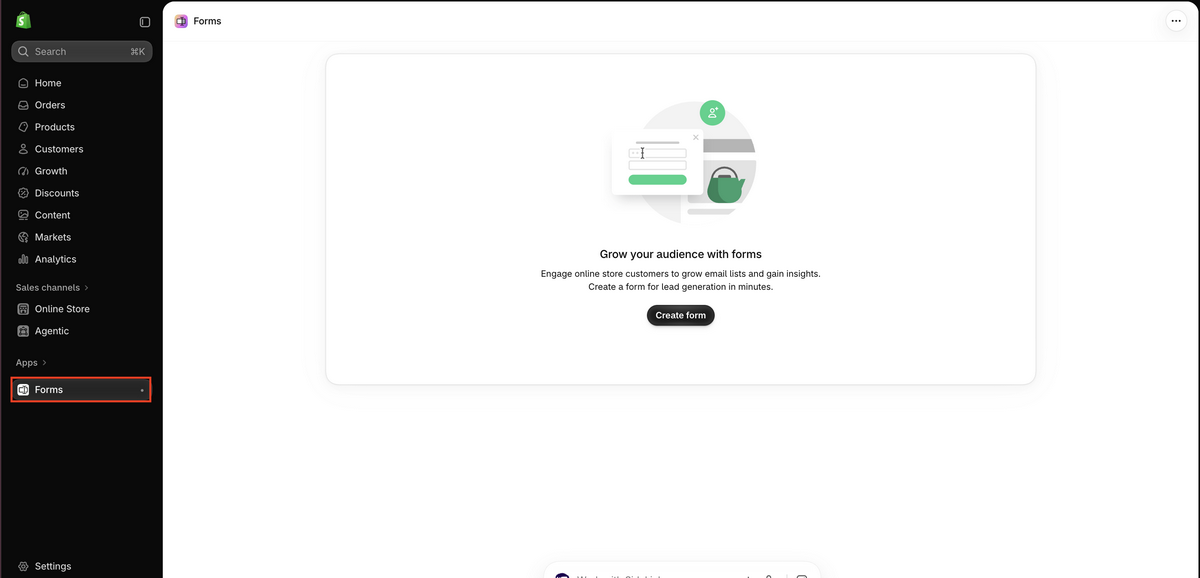
1. Install Shopify Forms and create a new pop-up form.
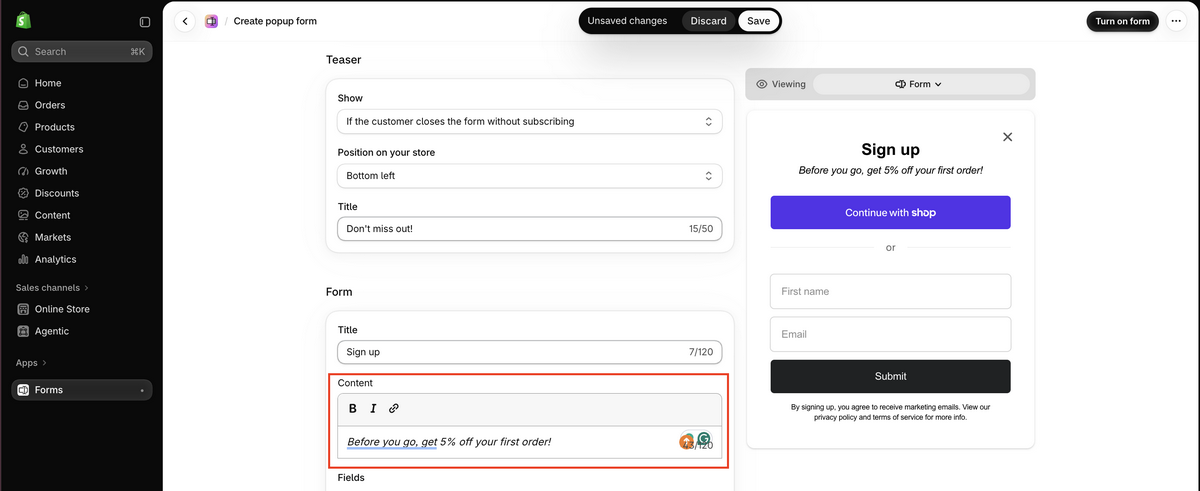
2. Customize your message with something like “Before you go, get 5% off your first order!”
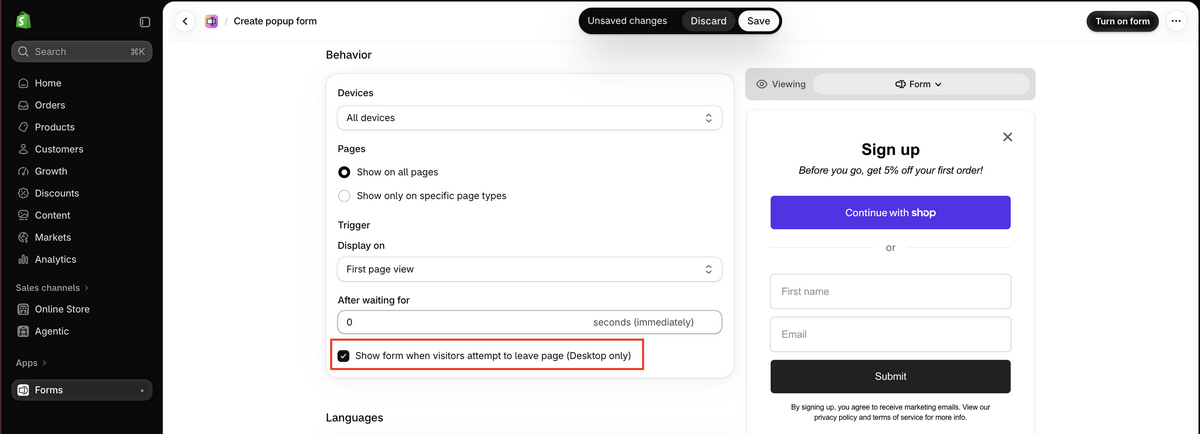
3. Under Behavior > Trigger, select Show form when visitors attempt to leave the page (Desktop only). Then, under Behavior > Pages, choose where you want the pop-up to appear.
4. Before activating your form, you have to enable the Forms theme app embed. This will redirect you to your theme, where you simply have to turn it on.
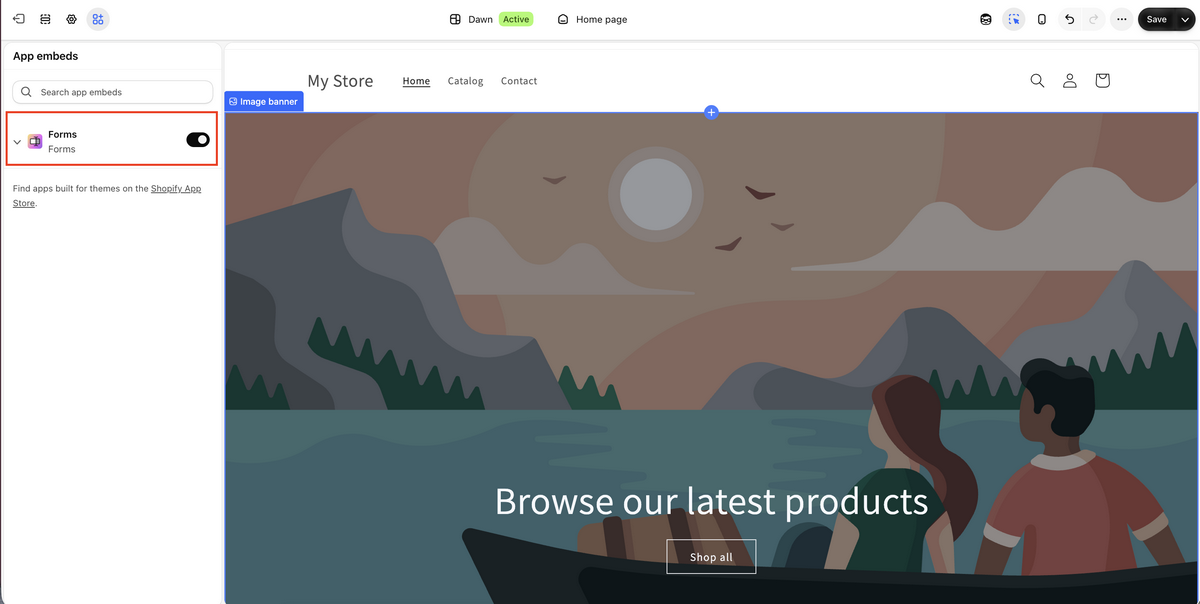
Shopify Forms already includes basic desktop exit-intent detection, so you don’t need a paid app. That said, more advanced targeting, such as showing offers based on cart value or detecting exit intent on mobile, may require a third-party tool.
Be careful with discounts, though. If shoppers learn that leaving your store always triggers a coupon, they might start doing it on purpose. And for dropshippers working with thin margins, even a 10% discount can eat into profits quickly.
💡 Pro Tip: To avoid showing discounts too often, use Shopify Forms’ Behavior settings to control when and where your pop-up appears. Shopify also remembers when visitors dismiss it, so they won’t keep seeing the same offer. For more advanced frequency limits, you’ll need a dedicated app.
Start with a small incentive, or try a reminder about free shipping before offering money off. Not every abandoned cart needs a discount to come back.
10. Add SMS And Retargeting Later
Once your Shopify store is getting consistent traffic and orders, you can consider taking abandoned cart recovery beyond email. Two options are SMS reminders and retargeting ads, both designed to bring back shoppers who left without buying.
Here’s how they work:
- SMS recovery: Send a short text reminding customers about their unfinished purchase, ideally with a direct checkout link. Shopify Messaging already supports SMS recovery automations in eligible countries, although messages come with a fee. For more advanced sequences, you can explore SMS marketing and automation apps.
- Retargeting ads: Show relevant products to people who previously visited your store or abandoned their carts. For example, someone who looked at a pair of sneakers might see those same sneakers advertised on Instagram the next day. You can set this up using advertising integrations such as Facebook and Instagram by Meta or other retargeting apps.
The catch? Unlike email recovery, these methods come with additional costs. According to Shopify’s SMS pricing, sending a marketing text to a US number costs $0.012 per message as of November 2026, plus a $2.15 monthly fee for an approved toll-free number. Rates vary by country, and additional charges may apply. Retargeting ad costs depend on your advertising platform, audience, and campaign budget.
There’s also an important rule: customers must explicitly consent to receive SMS marketing under applicable local laws. Having someone’s phone number for delivery doesn’t mean you can send them promotional texts, so always review your market’s requirements before launching a campaign.
🆕 Beginner’s Tip: Start with free checkout improvements and email recovery. Once you have enough abandoned carts to test additional channels, try SMS or retargeting with a small budget. Track how much profit you recover after fees, advertising costs, and discounts to see if you get a return on investment.
How To Set Up Abandoned Cart Recovery On Shopify
Setting up abandoned cart recovery on Shopify is pretty straightforward, and you don’t need a paid third-party app to get started.
I know, I’ve covered recovery emails earlier, but here’s a quick recap of how to set up abandoned cart recovery on Shopify, in case you want to jump straight into the setup:
- From your Shopify admin, go to Apps > Messaging > Automations. If you don’t have Shopify Messaging installed, download it for free from the Shopify App Store.
- Click Create automation.
- Select Recover abandoned cart or Recover abandoned checkout, depending on when you want to reach shoppers.
- Choose Email as your communication channel.
- Click Edit email to customize your subject line, message, and recovery link.
- Review your audience settings, test the email, and click Turn on automation.
That’s it! Shopify will automatically send recovery emails to eligible shoppers based on your workflow settings. Cart recovery targets shoppers who leave before checkout, while checkout recovery targets those who started checkout but didn’t complete their purchase.
For more details on setting up and customizing recovery emails, check out Strategy 7 in the previous section.
How AutoDS Helps You Reduce Cart Abandonment
AutoDS, an all-in-one dropshipping platform, won’t magically stop shoppers from abandoning their carts (we wish!). But it can help you tackle some of the problems that make customers hesitate in the first place, especially when it comes to shipping costs, delivery expectations, and product information.
Here’s how:
- More accurate pricing. With AutoDS’s pricing automation, you can factor supplier shipping costs into your product prices, helping you offer free shipping without overlooking those costs or surprising customers at checkout. Availability and calculations depend on your supplier and shipping settings.
- Better delivery transparency. AutoDS helps you monitor supplier delivery estimates and shipping methods, so you can give customers more realistic timelines. And once orders ship, automated tracking updates help you keep customers informed, depending on your fulfillment setup and Shopify notification settings.
- More trustworthy product pages. AutoDS’s AI Product Page Templates help you create detailed descriptions and product information. Just make sure any shipping claims match your supplier’s actual terms.
Of course, you’ll still need to configure Shopify’s checkout and recovery emails yourself. But AutoDS can help you get the dropshipping basics right.
So, if you’re ready to make running your store a little easier, try AutoDS for just $1 and see what automated dropshipping operations look like.
Is SMS Cart Recovery Worth It Compared To Email Alone?
Yes, SMS cart recovery is worth it compared to email, but only when your store is ready for it. SMS can be a useful addition to abandoned cart recovery, but that doesn’t mean it’s better than email.
According to Klaviyo’s 2026 benchmarks, abandoned cart SMS flows have an average click rate of 10.3%, compared to 6% for email. However, email generates more average revenue per recipient ($6.77 versus $4.48).
These are benchmarks across different audiences, not proof that one channel will outperform the other in your store.
Cost is another consideration. Shopify Messaging includes 10,000 free marketing emails per month, and abandoned checkout emails are always free. SMS, meanwhile, costs $0.012 per message to US numbers, plus a $2.15 monthly toll-free number fee, according to Shopify’s November 2026 pricing. Rates and availability vary by country.
SMS also requires explicit marketing consent under applicable laws. Having a customer’s phone number for shipping doesn’t give you permission to text them promotional offers.
For new dropshipping stores, we’d recommend starting with email. Once you’re getting consistent traffic and enough abandoned carts to measure results, test SMS with a small budget and compare the additional profit against messaging costs.
Frequently Asked Questions
Why do customers abandon their Shopify cart?
Some shoppers abandon their carts because they are just browsing or comparing prices, but others leave because of unexpected shipping costs, slow delivery, complicated checkout forms, limited payment options, or concerns about trusting the store. According to Baymard Institute, 40% of shoppers who abandoned a cart for reasons other than browsing cited high extra costs.
Does Shopify have built-in abandoned cart recovery?
Yes, Shopify offers automated abandoned cart and checkout emails through its free Shopify Messaging app. You can customize reminders, adjust their timing, and track recovered orders without paying for a third-party recovery tool.
What’s a normal cart abandonment rate for a dropshipping store?
There’s no widely accepted cart abandonment benchmark specifically for dropshipping stores. However, Baymard Institute reports an average e-commerce cart abandonment rate of 70.22% across 50 studies. Use that as a general reference, but focus on whether your own rate improves over time.
How do I set up abandoned cart emails on Shopify?
To set up abandoned cart emails on Shopify, go to Apps > Messaging > Automations, click Create automation, and choose Recover abandoned cart or Recover abandoned checkout. Select Email, customize your message and timing, and activate the automation. You’ll need the Shopify Messaging app installed first.
Does showing shipping costs earlier actually reduce abandonment?
Showing shipping costs earlier can help reduce cart abandonment, especially since unexpected shipping charges are one of the most common reasons shoppers leave. Displaying costs on product pages or in the cart removes unpleasant surprises at checkout. It won’t guarantee more sales, but it gives customers a clearer picture of what they’re agreeing to pay.
Is SMS cart recovery worth it compared to email alone?
For most new Shopify stores, email cart recovery is the better starting point because it’s inexpensive and easy to automate. SMS adds per-message costs and requires appropriate marketing consent. Once you’re getting consistent traffic and orders, you can test SMS alongside email to see whether the additional recovered profit justifies the expense.
Don’t Let More Sales Slip Away: Fix Your Checkout and Automate the Rest
Seeing shoppers leave without buying can be frustrating, especially when you’ve worked hard to bring them to your store. But cart abandonment is a normal part of running an online business, and it happens to everyone. That said, it still needs a bit of attention.
Learning how to reduce cart abandonment on Shopify starts with understanding why shoppers leave and fixing what you can control. Clear shipping costs, realistic delivery estimates, a simple checkout, and timely recovery emails can all make a difference. Start with the free, easy fixes, track your results, and add more advanced tools when your store actually needs them.
And if you’re running a dropshipping business, AutoDS can make things easier behind the scenes. From factoring supplier shipping costs into your prices to automating order fulfillment and tracking updates, it helps you create a more reliable shopping experience. Try AutoDS for $1 and check it out.
And as a bonus, here are a few more tricks about Shopify dropshipping: